Wait! Where did all the Christmas cookies go?! A few weeks ago, I got a very special request to send ukulele cookies up to New Hampshire. Ordinarily, you would have to pry my cold, dead, oven-mitted hand from the cookie sheet before I’d focus on something other than holiday cookies at this time of year. But this was a special request AND it was fun to bake something different.
This was so much fun, I might make it a tradition. I got to use different colors, I got to make someone happy, AND I have a fantastic tutorial to share with you.
These cookies are remarkably easy– I promise! And, they are pretty quick.
To start, I didn’t have a ukulele cookie cutter or anything that I could easily modify. So instead, I sketched the shape and used it to cut custom cookies.

Often when I do this, I start with an image printed from the internet. However, when I printed the picture, I noticed that the neck was very thin. I started to get nervous that it would break in transit. So I opted to draw my own, changing the proportions to make it wider. I was very conservative– perhaps a bit too much– because this is pretty wide. But as far as I know, they did not break, so I consider it a success!
Once your cookies are cut and cooled, outline your ukulele using a food-safe pen. You can buy these online or at a craft store. Wilton, Americolor, and all the other usual suspects make these neat tools. I use Rainbow Dust brand pens because the tips are thinner.

Then, pipe the dark brown pieces and allow those to harden (20-40 minutes, depending on how thick your icing is and how quickly it hardens.)
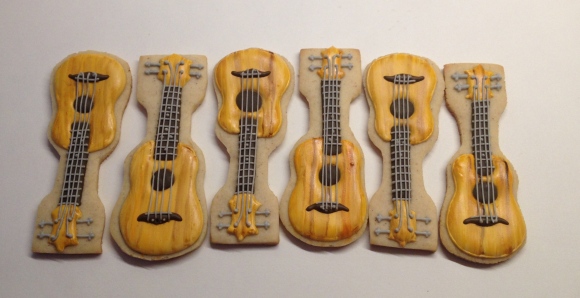
 Once it has hardened, add the tan pieces. You will notice that my tan is very light. This is because I intended to paint wood grain over it.

If you intend to paint over the tan, allow it to harden completely and proceed to the next step. If you do not want to paint wood grain, skip the next step and proceed.
Next, I used brown, orange, and yellow food coloring to paint wood grain. This is easier than it looks– start with the lighter colors and paint thick stripes. Then, go back with the dark brown and paint waving lines to look like grain.


Next, add all of the accents (except the strings!) using brown and grey royal icing.

Finally, using a thicker royal icing (20+ count), pipe the strings.

That’s it! A beautiful musical Christmas interlude.


[…] up with Scrabble pieces, and I think they look really cool. I used the wood grain technique from these cookies to create the background (tutorial below) and finished out the set with designs based on antique […]
LikeLike